Monday, November 8, 2010

A Marathon of Quick Tips

Yesterday was the 2010 NYC Marathon, and the hubs ran it in 3 hrs 45 minutes!
Yaaaaaaaaaaay!!!
And he was still able to walk and talk afterward!
Yaaaaaaaaaaaaaaaaaaay!!!

I'm sure the fact that I helped him train this year accounts for his impressive time... or... you know... the fact that he is something of a natural runner. Something I have never been.
Also, I'm sure this inspired him to power through after Mile 19:

I'm awkwardly holding up a sign cheering him on and trying not to thwack him with it.
Awwwwwww....
I am torn between being very proud of him, and wishing for the sake of our old age and old knees that he would retire in the VERY near future. Unfortunately, something tells me he isn't retiring from marathon running any time soon, as he came home with literature on the Washington D.C. Marathon, as well as one in Rome this coming Spring.
He might be able to twist my arm into cheering him on in Rome... we are taking donations towards our airfare now. :)

In response to a recent reader's comment (a.k.a. - Why didn't you tell me that would happen?!) I'm going to throw a few more tips your way in this post.

Fresh Herbs:
Fresh herbs are wonderful. They can instantly brighten leftovers, bring an otherwise mediocre meal to life, perfume your whole kitchen, and do it all with basically zero calories.
Note: when using fresh herbs, remember that they contain minute amounts of water within them, so if you throw them whole into a pan of hot oil, they will pop and attempt to leap directly out of the pan, and can spatter you with hot oil at the same time.
Other than making sure your meat browns properly, that is also why you always want to make sure any protein you are cooking/searing is pat fully dry. It's not fun when your food spits back at you.

Garlic:
As you may have noticed from my recipes, I really enjoy cooking with garlic. Not only is it delicious, but it also helps your immune system fight off ills. I consider it a staple flavor in many of my meals.
Note: If you are following any recipes of mine in which I say to grate the garlic and then only give it about 30 seconds to cook in the pan, that is because I am using a superfine Microplane grater, and the resulting garlic is now a wet paste that only needs 30 seconds to cook before it could start to burn.
If you are in fact mincing the garlic in your home, or finely slicing, feel free to give the garlic a good 2 minutes in your hot pan to allow the flavors to sufficiently mellow.

Sauces:
When any sauce or gravy tells you to start off with onions and garlic, I suggest keeping your pan on medium to medium-low while they sweat out. Onions first, and when they are almost ready, the garlic. Once you have added either a liquid (stock, wine, etc) or a can of crushed tomatoes, then turn your heat up to medium-high to simmer. That way you avoid bitter and burnt onions and garlic.
Also, add your fresh herbs after the onions and garlic have finished cooking and the heat is still low. Then they won't act like popcorn in your pan.

Meat:
When I tell you "about 7-9 minutes" as a cooking time, say when a pork loin is finishing up in the oven, I'm telling you what I'm doing in my kitchen in my oven, based on whatever size cut of meat I happen to have that day. Even tho every oven can be set to 425º, that does not mean that every oven is actually at 425º, and a tenderloin can vary from .75 lbs to 1.5 lbs and require very different cooking times.
Because I cook every day, I generally have a feel for when my food should be done.
And yes, on occasion, I have cursed a blue streak after discovering my psychic cooking abilities have failed me and I have to somehow salvage undercooked meat.
But for Tried-and-True cooking times, the use of an instant-read thermometer is always a safe bet. Some ovens come with probes included, but if yours does not, you can easily pick up meat thermometers at just about any store that sells kitchenware.
I got the following charts from What's Cooking America (because I'm way too lazy to retype this whole thing!) Except for my thoughts on "Well Done"*.
And remember, large roasts and birds will continue to cook for a bit once you remove them from the oven, so it's good to take them out when they are about 5-10º shy of your desired doneness.


Beef and Lamb Cooking Temperature Chart
 

Roasts, Steaks & Chops


Rare
120 to 125 degrees F

center is bright red, pinkish toward the exterior portion

Medium Rare

130 to 135 degrees F
center is very pink, slightly brown toward the exterior portion

Medium

140 to 145 degrees F

center is light pink, outer portion is brown

Medium Well

150 to 155 degrees F

not pink

Well Done
160 degrees F and above


steak is uniformly brown throughout *(and a waste of good meat)


Ground Meat


160 to 165 degrees F
 

no longer pink but uniformly brown throughout


Poultry Cooking Temperature Chart
 

Poultry (Chicken & Duck)


165 degrees F

cook until juices run clear


TurkeyNOTE: A 12-lb turkey can easily handle 60 to 90 minutes of resting. During that time, temperature can rise 30 degrees if not exposed to drafts.
 

165 degrees F


juices run clear - leg moves easily


Stuffing (cooked alone or in turkey)
165 degrees F


Pork Cooking Temperature Chart
 

Roasts, Steaks & Chops


Medium


140 to 145 degrees F


pale pink center

Well Done


160 degrees F and above


steak is uniformly brown throughout


Pork ribs, pork shoulders, and beef brisket
160 degrees F and above
medium to well done


Sausage (raw)


160 degrees F


no longer pink


Ham


Raw
160 degrees F


Pre-cooked
140 degrees F


For more of my Cooking Basics check back to this post.

For Knife Skills and Care, take a gander back here.

Hope this helped.

Friday, November 5, 2010

I Don't Cook with Political Correctness

Why not?
1 - I am not a Vegetarian. Eating the flesh of other creatures seems fairly un-P.C. to me on whatever scale you might use. (But it's tasty!)
2 - I am not a Vegan (In my book, a sure sign of sanity, if I ever there was one.)
3 - I have recently rediscovered veal, and I reeeeeeeeeeeeally like it.

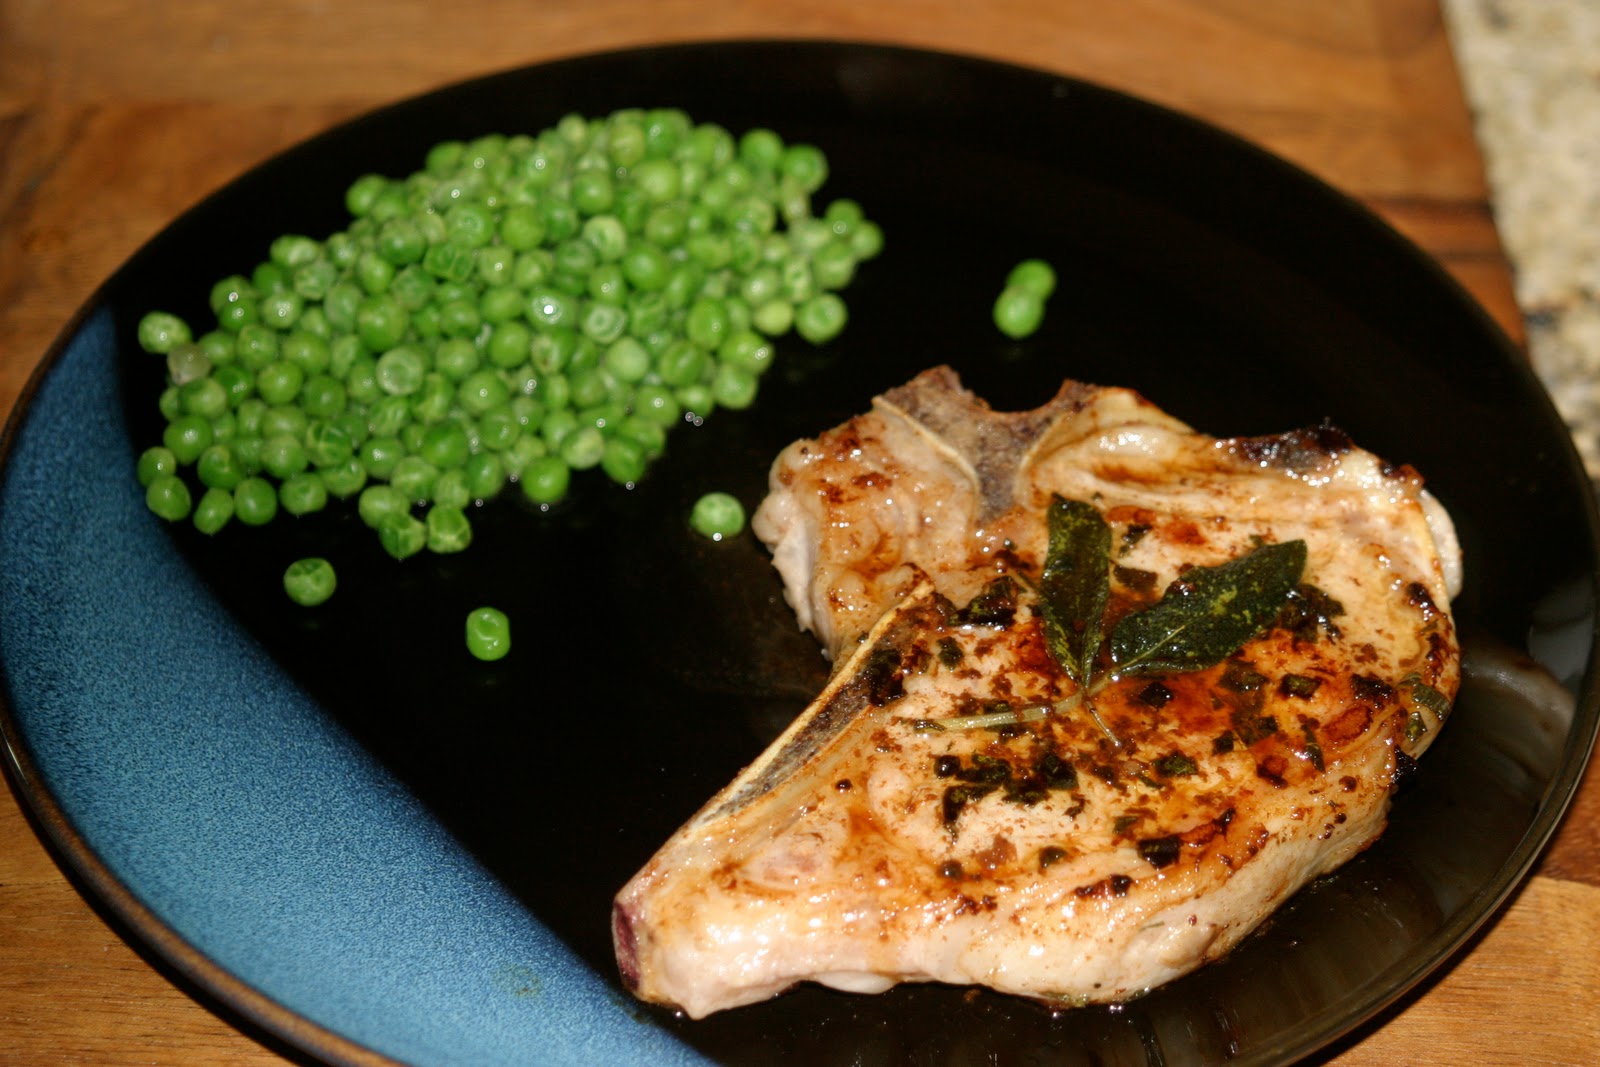
I have made a supremely delicious veal ragú recently, and I have since moved on to veal chops. Tonight's dish:
Veal Chops w/ Sage Drizzle and Buttered Peas


Sage is an interesting herb. I think it's one of the herbs I can't always place when I'm eating something. That, and when I cook with it I can't help petting it, marveling that someone picked a fragrant, fuzzy leaf and deemed it edible.
The fuzz-factor kind of throws me off.
However, on to the meal.

For the veal chops:

Sprinkle both sides with salt (and pepper if you like) and chopped sage. Press the sage into the sides of the meat.
In a hot skillet on medium heat, melt 1 TBSP olive oil with 1 TBSP butter. When almost rippling, add the veal chops and cook for about 5 minutes on each side. (1" thick chops)

Once you remove the chops from the pan, deglaze with white wine and cook down to create your "Sage Drizzle".
Aside: OMG I cooked a meal without garlic!!! Someone check me for a fever!

For the peas, I melted a tiny bit of butter and oil in a pan and fried a couple whole sage leaves to infuse the oil/butter mixture. (Also saved for presentation of the dish.) Then I added the peas and cooked them until tender, about 3-5 minutes.
This meal was very delicate in flavor, so don't make it if you're taste buds are crying out for a balsamic kick or the zing of fresh ginger.
However, it was juicy and delicious, and I wanted a whole extra chop after finishing the meal.
Damn.

Aside: Last night I saw "The Merchant of Venice" on Broadway with Al Pacino in the role of Shylock. The cast was really solid, and Pacino was very good... tho occasionally I thought he was just being crazy Pacino instead of vindictive Shylock. And anyone in the first 5 rows got a personal baptism from Pacino's very lips. (I'm glad I was a bit farther back...)
If you can't make it to NYC, you can always watch it (with this very pretty cast...) on dvd http://www.imdb.com/title/tt0379889/

Tonight: Interpol!

Tuesday, November 2, 2010

Special Delivery

So I have had a cold since Tuesday, October 26th (that's 8 days for anyone counting...), and I am REALLY FREAKIN' TIRED OF IT!
I'm done!
Move on!
I have served my time in aches and chills and sneezes and sinus headaches, so germs:

GET LOST!

The real kicker is that a week before I fell ill, I made a large pot of homemade chicken soup for two friends that were sick, one downtown and one in Brooklyn, and delivered* them to the various parties without touching them or anything else, and then used hand sanitizer as soon as I left.
So me getting sick? Totally Not Fair.

The soup
Fortunately I had made so much soup that I had some leftover for myself to defrost when I fell ill.
The soup consisted of:
chicken stock, homemade
2 chicken breasts poached for 20 min in the stock, then removed and shredded
carrot/celery/onion trifecta, sautéed in a bit of olive oil
cubed butternut squash, roasted in the oven
pasta
salt
thyme
dill
and of course, love.

However, as I am still feeling less than stellar, I can't be bothered to tell you proportions or order of operations, or really anything useful, because I did the whole thing off the cuff anyway.

But I took a picture of my soup.
So I posted it.
It was tasty.
Tho clearly lacking magical restorative powers...

Now I must get healthy as my in-laws arrive tomorrow to watch their son (my hubs) run in the NYC Marathon on Sunday, and I need to not be coughing and sneezing on them.
So send good vibes, people.
Get 'er done.

*The Rock 'n Roll Gourmet does not actually have a delivery service, so don't get your hopes up... 

Monday, November 1, 2010

Sage & Pecorino Stuffed Pork Tenderloin

More experimentation, inspired by what's on hand and what might only have another day or two of a shelf life.
And it worked!!

I feel as though all I ever cook (and so all I really write about on here) are dishes consisting of chicken breasts or pork tenderloins. Again, because they are both affordable and healthy lean proteins, and also because they ensure that I can make dinner in under half an hour most nights.
The only problem is redundancy of meals!

So this time 'round I had fresh rosemary, some sage that was on its last legs, and as always I had pecorino cheese. So, I decided to stuff my tenderloin instead!

I made a slice straight through the center, but refuse to hammer out the meat. Yes, if you do so, you could get more of a roll going, but that isn't the point. I like my meat PLUMP and juicy, and when you beat chicken or pork into a cutlet or schnitzel-ready, you just destroy the meat.
At least that's my opinion.

Since this was only a .85lb tenderloin, I only used 1/4 of a sprig of fresh rosemary, finely chopped, and about 6 sage leaves, also finely chopped. However much fresh herbage that creates, add an equal amount of grated cheese. Sprinkle that down the center of your tenderloin pocket and roll shut.

Use a little butcher's or kitchen twine to make sure your tenderloin stays closed and your filling stays inside.
Season all over with salt, and add it to a hot pan to brown.

Brown all sides and throw into a 425 degree oven for 7-10 minutes (for a tenderloin as small as this one I only needed 7 minutes.)
Remove to a plate to rest and start the gravy.

To the oil and drippings in the pan I added 1 small shallot, diced, 1 clove of minced garlic, and a bit of salt. Once that has softened I add a little flour and stir to incorporate it well, and then throw in more diced sage. Maybe another 5 leaves worth.
(Remember, this was just to feed 2 people.)
Add equal parts chicken stock and white wine and reduce.


That pork looks a bit pinker than it did in real life, but it was tender and delicious. The sage was aromatic, the cheese had a bit of bite that worked surprisingly well with the pork, and the small bit of rosemary made the whole dish feel earthy and pulled together.
(You could go with just one or the other herb. I happened to have both, so used both.)

The hubs approved and it will definitely be a new addition to the dinner rotation!

Saturday, October 30, 2010

All Abooooooooard!!!!!

I'm not exactly sure what the Rally for Sanity/Rally for Fear was supposed to accomplish, tho John Stewart's parting words were spot-on and made me a bit weepy and wistful. 
(Seriously, why are reasonability, sanity, compassion and kindness so difficult to practice?)

But if nothing else, the rally made for one truly wonderful moment.

I tried to crop Ozzy's gut out of this screen capture...
I have sung Ozzy Osbourne's "Crazy Train" many times.
Growing up, I listened to a lot of Cat Stevens/Yusuf, including "Peace Train".
Seeing them "battle" on stage and leave arm in arm was, in a word, FANTASTIC!

And yes, following that with "Love Train" basically had me dancing in my living room.

Good messages.
Good feelings.
Hope.
End Selfishness.

Friday, October 29, 2010

The Best Roast Chicken Ever

According to the hubs, this is The Greatest Roast Chicken Ever.

And to me, it's The Easiest Roast Chicken Ever.
But possibly also one of the tastiest possible.

WIN! WIN!

And just whhhyyyyyy is it so delicious AND simple?

BACON!

Also, it only requires 6 ingredients:
1 whole roaster chicken (between 3 and 6 lbs.)
3-6 slices of bacon (depending on size of chicken, or preference)
1/3 cup of brandy
1 onion, quartered
salt
water or chicken stock
THAT'S IT!!!!!
There is no brining, no complex stuffing, no chopping except for 2 whacks at an onion, no picking the tiny leaves off of fresh herbs, nada.  The hardest part of this meal is just remembering to baste!
And frankly, in my house, the only things I'd have to go out and purchase for this meal would be the chicken and the bacon, as the other ingredients are always on hand in my kitchen.

It's such a magical food.
 This recipe was inspired by an episode of one of Nigella Lawson's cooking shows, but I could not find the recipe online later, so I just winged it, added a bit more bacon than she mentioned, and threw in the salt for the cavity and the onion out of habit.

Step One: Preheat your oven. (I do 425º for the first 30 minutes, and then the rest of the time cook the chicken at 350º but stick with whatever method you're used to.)

Step Two: Brown your bacon and set aside to drain on paper towels. Possibly make extra as you KNOW you're going to want to snack on some once you smell it cooking.

 Step Three: Pour your (pre-measured) brandy into the pan of bacon drippings and allow it to sizzle (step back!) and combine until it calms down. Set this aside off of the heat.

See the flecks of bacon from the drippings?!
For the bird, I salt the cavity and then place half to a whole onion (quartered) into the cavity for flavor and moisture. (Depends on the size of both the bird and the onion.)

Step Four: Insert bacon into the chicken's cavity and truss your bird. Refrain from placing broken bits of bacon under the chicken's skin, as they will burn a bit. (Things you learn the hard way.)

Step Five: Pour brandied bacon fat over the chicken.

Step Six: Add about 3/4 of an inch of water or chicken stock to the bottom of the pan for basting and to prevent spitting or burning.

 Step Seven: Cook.
(Yes I chose to throw some carrots and onion into the bottom of the pan as well because then you get roasted carrots THAT TASTE LIKE BACON!)
This happened to be a 6 pound bird, so it took 1 hour and 30 minutes to cook, and I basted every 15-20 minutes... or when I remembered.

Crappy photo taken because I just wanted to EAT!
Let the chicken rest on a baking sheet (or carving board, wherever works for you) and turn those amazing drippings into a sweet dark gravy. All I used was a tsp of flour to help it thicken and a little time over a burner with a whisk.

THE GREATEST ROAST CHICKEN.
You're welcome.

Monday, October 25, 2010

Not Floundering For A Meal

Ha ha. Yes.
Terrible pun.
Shoot me.
Apparently I have some of my punster grandfather in me other than just the legs*.

Dinner last night was flounder, as it was on sale and every once in a while I try to feed us something a bit lighter than average for dinner. Especially since it's a relatively warm weekend for October, so the light fare feels good.

Have you ever done a search online for recipes for flounder? They are all SOOOOO boring!!! And the other 80% of them are recipes for flounder stuffed with crabmeat (of which I am not the greatest fan).
So, I did a spin on a sauce I made for chicken, and I have to say it worked great on the flounder. (Or any other white fish.)

For the cooking of the flounder, I simply patted it dry, seasoned with salt, dredged through a little flour, and cooked it in a sauté pan for about 2-3 minutes per side. It's done when you try to remove it and the friggin' thing will not stay in one piece for a pretty plating shot.

Not shown: Grandpa fresh dill, wine, stock
The above is the basis of the sauce. About half a pint of grape tomatoes, halved, 1 shallot, 2 cloves of garlic, the zest and juice of half of a lemon, about 2 tablespoons of capers, white wine and a splash of chicken stock if  you want to mellow the wine flavor a bit.

In olive oil, sauté shallot until softened (about 3-4 minutes). Then add the tomatoes and allow them to cook for 2-3 minutes, or until they look like they are starting to soften. Next add the garlic (minced or grated) and cook off for about 30 seconds, stirring well.
For 2 fish filets, I probably used about 1/4 cup of white wine and 1/4 cup of chicken stock to make the sauce. After adding the liquids, squeeze the juice from the half lemon, toss in the zest & capers, and about 2 tablespoons of freshly chopped dill.
(Reserve a bit for garnish.)
Let the sauce reduce and thicken a bit, season with salt, finish it with a tablespoon (more or less) of butter for richness and gloss, and pour over the fish.

Very tasty, and the tomatoes made it slightly different from the average lemon-butter-dill sauce.
To round out the meal I used some leftover leek & white bean purée (which I really just love, and this time did not contain mascarpone) and tossed in some peas for good measure. I enjoyed the meal, and so did the hubs.
Don't like dill? 
Try substituting cilantro. It will give a bright kick to the sauce.
But this is a light meal packed with protein and veggies.
Enjoy!

*While my face clearly resembles my mother (tho she was much more of a knockout than I ever was) the rest of my body is kind of an odd amalgamation that does not directly reflect on either side of my family in any particular way. However, when I was still a teenager, possibly 18 or so, we were looking through some old black and white photos, and my mom found one of her father at the beach wearing swim trunks. She paused for a moment, pointed and exclaimed to me, "You have grandpa's legs!"
Rock.
Maybe not exactly what every teenage girl wants to hear, but at least it solved part of the puzzle that is me.

Friday, October 22, 2010

Spinach & Artichoke Pasta

Really?
Only one reader liked my 3-day red wine-braised short ribs with porcini and tomato dinner?
That's just... well that's sad really. On a number of levels.
I'll stop shaking my head in disbelief long enough to post another meal, albeit a slightly clichéd one.

I have probably had the same package of frozen artichoke hearts for the past year, JUST IN CASE I ever wanted to make Spinach & Artichoke dip.

Finally, it all worked out.

I was without a protein to make for dinner and scrounging around, finding little in the way of fresh ingredients that would make an inspiring meal, when my brain clicked. I had just registered that I had fresh ricotta cheese and half & half, and I knew I could finally make S&A dip, only I would serve it over pasta so it would be dinner.

Step one: set water to boil and defrost artichokes and spinach
Step two: sauté one medium onion, chopped, in olive oil. Add 3 cloves of grated garlic (allowing 30 seconds to cook out and become fragrant) and toss in 1 package of defrosted artichoke hearts. 

Once the artichokes have warmed through, add in the defrosted (and well-drained) package of spinach and season with salt.
(Optional addition here of 1/4 cup of white wine to simmer and reduce down to almost nothing except flavor.)
Once those have picked up some of the onion-garlic flavor, it's time for the CHEESE!!!
 I used about 7 ounces of fresh whole milk ricotta.
Thin out the cheese into a sauce with any of the following:
chicken stock, half & half, pasta water
Use a little at a time until you reach your desired consistency.

Then, MORE CHEESE!!!
This time about 1/3 cup freshly grated parmigiano reggiano.
Stir to combine.
If you like nutmeg, this would be a good time to grate a few wafts of nutmeg into the mix.
I like to add the juice of about half a lemon because I think it really brightens what could otherwise be a really heavy, creamy mess.

Check your seasoning and drain the pasta 1 minute shy of the box's directions, reserving a bit of pasta water in case you still want to thin out your sauce. Add pasta to the pan and stir well to combine.

I topped mine with a little more parmigiano reggiano and a little lemon zest.
It's a bit heavy, but it's a delicious indulgence and packed with vegetables.
So long as you keep your portions small ;)

Monday, October 18, 2010

So-Bro(nx) Teachers Dinner Party

I taunted you with the mention of an amazing dinner for a party, and now I am delivering.

This meal took me 3 days to cook, but it was absolutely worth it. (As are the leftovers!)

The whole dinner party kind of came together out of little bits of serendipity. The hubs announced one night that he wanted to have a dinner party with some of his coworkers before our roof closes for the winter. I did a little mental math and suggested drinks on the roof and dinner in our apartment, considering that eating outside in October is a good way to eat an unfortunately cold meal. He agreed, but no solid plans were made.

Next, I noticed that short ribs were on sale. This of course lead me back to a wonderful cookbook I own called All About Braising (by Molly Stevens), and which I mentioned when I made hard cider-braised chicken. (It really is a wonderful cookbook.) Then I thought how easy it would be to feed guests with short ribs.
You can see the lightning-quick flashes of brilliance that occur in my brain...

Finally, I checked the calendar and saw the Monday was Columbus Day, which would mean the teachers would have the day off. I then informed the hubs that, if he really wanted to (have me cook for all his buddies so he could) have a dinner party, that Monday was the day it was going to happen.
He agreed.
Everyone was in.
I started cooking... Saturday.


The recipe: Red Wine Braised Short Ribs with Porcini Mushrooms and Tomato

Step one of this meal is to make a marinade, simmer, allow to cool, and THEN put the meat in for 12-24 hrs of luscious bath time.
The marinade includes:
2 bay leaves
1/4 teaspoon allspice berries, crushed
8-10 black peppercorns
3-4 whole cloves
All of that goes into a little sachet of cheese cloth, to be used and re-used for the next 3 days. As I did not have any cheese cloth on hand, I used one of my empty tea bags I have on hand for brewing loose tea, and it worked perfectly.


In a heavy-bottomed pot, use 2 TBSP olive oil to sauté 1 large onion, 1 celery stalk, 1 carrot (all coarsely chopped and to be discarded later) 2 peeled and smashed cloves of garlic, 1 1/2 tsp salt, and 1 whole bottle of "robust dry red wine". I opted for a Dolcetto, as that was what I had on hand. It worked beautifully.
Sauté the vegetables for about 7 minutes before adding the wine and spice sachet, and then allow to simmer on low for ten minutes to bring the flavors together. Remove from heat and allow to cool.

The gorgeous short ribs
Once the marinade has cooled, cover your short ribs (about 4 lbs) with the marinade & sachet in a non-reactive bowl and refrigerate overnight, stirring on occasion to make sure everything is covered.

This is what happens when you leave beef in a bottle of red wine overnight.
Day 2
About 20 minutes before you start to cook, soak 1/2 ounce of dried porcini mushrooms in 1 cup of warm water. (The water will be used later as well as the mushrooms.)
Preheat the oven to 325º

Make sure to let your short ribs come to room temperature and pat them dry.
In the same heavy bottomed pot, add another 2 TBSP of olive oil and begin browning your ribs on all sides. Do this in batches so as not to crowd your pan and prevent steaming instead of browning.
When all of your meat is browned, set them aside and wipe any charred bits from the bottom of the pot.
Brown bits are good. Burnt bits are not.
Pour out the fat rendered from the ribs and add 1 fresh TBSP of olive oil and add:
1 large onion, thinly sliced (or chopped) - allow to cook down until just browned and softened, 8-10 minutes
2 cloves of garlic, minced. Cook an additional minute.
1 14 oz can of chopped tomatoes with their juice
Porcini mushrooms, drained and coarsely chopped, and simmer another 8-10 minutes
Pour in the reserved (and strained) mushroom liquid and the wine used for braising (strained of the first round of onion/carrot/celery/garlic but RETAIN the sachet) and bring to a boil.

Add the short ribs to the pot, as well as the spice sachet and 2 sprigs of rosemary*.
If there is a great deal of space between the meat and the top of your pot, you can place parchment paper inside so that it is just shy of touching the food, and then add the lid. I did not do this step as my pot was quite full.
Place the covered pot onto the lowest rack in your 325º oven and braise gently 2 1/2-3 hrs, turning the ribs gently every 45 minutes or so, until the meat is falling-off-the-bone tender.

*The recipe does not say this, but I would place the rosemary in cheesecloth or a tea bag as well because otherwise in your final product you have giant loose rosemary leaves floating around, which can be unpleasant to eat.

Success! Meat has fallen off the bones.
While you COULD serve this meal at this point, I suggest letting it sit overnight. Not only will that allow the flavors to meld more completely, but it also allows you to much more easily degrease the sauce.

Ew.
Let the pot cool down (this can take a few hrs) and then place it, covered, in your refrigerator overnight.
The next morning, scrape of as much of that congealed yellow fat as you can from the top of the stew.

Close-up Ew.
Cuz that's some seriously thick fat coagulation.
Aren't you glad you didn't eat that yesterday?

YUM!
Reheat your meal gently on a low flame (or back in the low oven) with the lid on. (Discard spice sachet)
When you are ready to serve, place 1-2 short ribs on each plate and top with the sauce, which should be the "consistency of a thick vinaigrette." 
(Truthfully mine was a bit runnier, in which case I could have tried to reduce it a bit more without the meat in, or just serve it in a bowl. We did not mind the runny sauce as it was juicy and fantastic.)

Serves 6
But what do you serve WITH this decadent slow-cooked meal?

Mmm... charred.
I opted for a potato-cauliflower mash, which was DELICIOUS all by itself, and I was just as happy that there were leftovers of this as well.

 Take one whole head of cauliflower, chopped into reasonably sized chunky florets.
Drizzle with olive oil and season with salt, and roast in a 400º oven until browning. About 20-30 minutes, depending on size.

In a large pot of water, add 3 medium-large sized yukon gold potatoes (peeling optional) chopped into chunks, and bring up to a boil. Cook until potatoes are fork-tender, and RESERVE the cooking water!!
(If you thought pasta water was starchy and could bring sauces together, boiled-potato water is even better!)
Could have used a touch more olive oil.
At the same time that the cauliflower is roasting in the oven, have the oven do double duty and roast half a head of garlic (or one small head of garlic, maybe 8 or 9 cloves) as well. Slice off the top of the head of garlic, drizzle with olive oil to prevent burning, and season with a touch of salt. Wrap in tinfoil, and since this is a small head or only the inner portion of "colossal garlic" it should only take about 35-40 minutes to roast.
Allow the garlic to cool before handling!

Yes, this photo was taken of the leftovers I snacked on all week...
The food processor does all the work for you. First, whiz the cauliflower with a bit of the potato cooking water to get it going into a rough chop. This will not only help get a smooth texture in the end, but make room in your FoPro for the potatoes!

Next squeeze the roasted garlic from its papery shell and add that to the food processor, along with the potatoes, and a generous pinch of salt. Add another small ladle of potato water so everything moves along easily.

The finishing touch that will make the whole dish luscious is 3/4 of a cup of mascarpone cheese. It will make the purée velvety and rich, and incredibly luxurious to eat.
(And when you consider 3/4 cup of mascarpone to 1 entire head of cauliflower and 3 potatoes, it's really NOT that much fat per serving, and so still a pretty healthy side dish.
At least that's what I'm telling myself as I devour it...)

Check again for seasoning, and if it's still too tight a mixture, just add a bit more water and blend until you get your desired consistency. It should be creamy, not watery, but also it should be smooth, not gunky.

Brownie Sundae!
Dessert was super simple. After 3 days of cooking, I wasn't about to make a fancy dessert too!
(OK, I DID bake the brownies myself, but from a mix, so not like it was hard work.)

Step one: warm brownies and then place in the bottom of a dish.
Step two: scoop desired flavor of ice cream on top of brownie (we offered chocolate or vanilla)
Step three: top with raspberry sauce
(OK I made the sauce too, but it was beyond simple. Bag of frozen raspberries, about 1/4 cup of sugar, a splash or two of water to hasten the maceration, mash with fork or potato masher, and serve at room temp or with 30 seconds in the microwave. I made the "sauce" about 3 hrs before we ate it and left it in the fridge ready to go.)

So did I deliver?
Was that not a meal to make you wish you lived in my neighborhood and could just "stop by" around dinner time?
Because really, it was. 
And it was also worth the 3 days of prep and cooking.
This is the perfect time of year for this kind of cooking, so I suggest keeping an eye on the prices of short ribs at your local market and planning a dinner party of your own some time soon.
Also, buy the cookbook.
It is chock full of great meal ideas, as well as idiot-proof in its explanations.
Enjoy.

Friday, October 15, 2010

Lesson Learned

I remember when I was younger that days like today would get me really worried.
Not because the wind is gusting to 30 mph or because it's overcast with the threat of rain. 
It's October. 
I expect those kinds of days.
No, what really got me worried was that it was only October 15th, and if the high temperature was only in the mid-50's this early in the month... 
WAS MY MOM GOING TO MAKE ME WEAR A PARKA OVER MY HALLOWEEN COSTUME?!?!?!
Because that is just SO not cool.
Unless you're dressed as the Michelin Man*.

* Also not cool. Although Stay Puft would be acceptable.

So in this weather I make dinner a la Bolognese, or just a ragu, quite often and for many reasons. It's delicious, it's fairly easy**, it's comforting and satisfying... but the most common reason that it ends up on our plates is because ground meat is inexpensive. And if one particular meat is on sale that week, then that is going to be what we eat.

However, I recently learned my lesson on that front.
Beef Bolognese - delicious, rich, classic
Veal Bolognese - delicious, delicate
Chicken Bolognese - not my first choice, but with a little tweaking can be a nice change
Turkey Bolognese - tastier than chicken if you get a little color on it
Dark Meat Turkey Bolognese - Make Burgers Instead

Dark meat turkey is so much more flavorful than turkey breast that it just lends itself to making burgers or other meals in which the meat is the star flavor. When I used it in my bolognese recently, I was really thrown off by the strong turkey flavor. It was like having leftover Thanksgiving turkey but covered in tomato sauce instead of gravy and cranberry sauce.
Maybe it won't bother you, but for me it was just weird.


** Easy if you cheat and use a pre-made slow-cooked tomato sauce instead of fresh tomatoes which take hours and hours to cook down...
I started out sautéing a chopped onion, 1 grated carrot, and the dark meat turkey.
Just make sure it's opaque once cooked since it is poultry.

Add favorite tomato sauce if lazy, or a 14oz can of crushed tomatoes if you have all afternoon, and then the herbs and seasonings of your choice .


Such as fresh basil ribbons!
Don't forget the wine of your choice to cook down as well.

When the sauce has melded and come together, add a bit of milk or cream for richness.
Check for seasoning.

This looks just like any other sauce, but alas, it will not be happening again in my kitchen.
That is also why this is a bit of a slap-dash description of the meal.
I didn't actually want to remember it.
But, that's just me.

Tuesday, October 12, 2010

Impromptu Breakfast Party!

So one of my dearest friends who lives waaaaaaaaaaaaay out in Brooklyn, and (unfortunately for me) lives in a little apartment block full of awesome people, so really, why venture to Manhattan other than for work?

Well, apparently for a really good yoga class just 3 blocks south of me!
SCORE!!!
It meets at 9AM... on a Saturday.
BUMMER!!!

However, that still led to a lovely little impromptu breakfast date at Casa RocknRoll.

Worst photo of tomatoes ever.
By definition, impromptu means you have to work with what you have on hand. So while asparagus, smoked salmon, and goat cheese might have made an elegant fritatta for company, instead ours had tomato, basil, and arugula.
Step one: Preheat your broiler, then in a non-stick pan sauté 1 medium shallot in olive oil. Add tomatoes and season with salt.
When the tomatoes have cooked down for about 3-4 minutes, add one large clove of garlic, grated, about a TBSP of chopped fresh basil, and stir to cook and combine.

Next I add 5 eggs, beaten together with about 2 TBSP of cream (optional).
I had previously seasoned the eggs with a generous pinch of salt as well.
Once the egg has coated everything I added a handful or so of fresh baby arugula. 
(If you want more of a peppery bite, throw a couple handfuls of the arugula in to wilt with the tomato in the earlier step before adding the egg.)
Grate about 1/4 cup of parmigiano reggiano and sprinkle that over the top of the eggs.
Cook this on medium-high for about 4 minutes, or until the sides begin to set.

Once the sides of the eggs have set, place the whole pan under the broiler and cook an additional 2-3 minutes, until the eggs have cooked and the top has turned a light golden brown.

Fritattas are super easy to make, as versatile as your imagination, and easily feed a crowd.

Aside: I just made a killer dinner for 7 last night for some of the hubs's coworkers. It was definitely a success, and I am very excited to share it with you. However, since it took 3 days to prepare, I am a bit wiped out. So instead I am just dangling this little carrot for you so you check back in here in the hopes of finding that meal posted here.
And it will be.
Soon.
Promise.

Friday, October 8, 2010

Things I TOTALLY NEED. No Really. I NEED Them!

So......... I had a date with a dear friend tonight, but before that happened I:
Put away groceries
Washed dishes
Polished various tarnishing kitchen items and vases
Washed the dark polish smudges off my shirt
Cleaned the kitty litter
Vacuumed the hallway, living room, and couch cushions
Broke up cardboard boxes
Dropped off the hubs' broken badass boots at Fluevog for repair
Dropped off my dying 2002/2003 limited edition Fluevogs for repair (mine have purple embroidered flowers climbing up the side rather than the sexy slit... they are my FAVORITE)
Stopped at Sur la Table to pick up one or two necessary things...
And then I found:

My new favorite pointless purchase:
FYI "aglio" is Italian for garlic

HOW CUTE IS THIS?!?!?!!

And of course I already had enough garlic at home to fill it right from the get-go. I might have to break heads in the future if I have more to store!!!

Still, I'm impressed that I managed to walk out of Sur la Table with only this, a new container for drying silverware, a folding electronic meat thermometer (I don't own a single thermometer!), salve for butcher's blocks, and narrow rectangular measuring spoons that fit inside spice jars.

Pretty thrifty by my standards!!!

But still... isn't that container just TOO CUTE?!?!
Kitchen Supply Stores are to me as Tanning Beds and Liquid Eyeliner are to the abomination that is the cast of Jersey Shore.
Only my IQ doesn't drop every time I open my mouth...
No, really kids. 
Put your money in the bank, fade to a human color, WASH YOUR F*CKING HAIR, and take some freakin' elocution lessons.
I'm out.